Solar ovens are devices that collect solar energy and utilize it to cook food without any other fuel. Here’s how to make one for less than $5 with simple materials found around the house.
Advantages
Solar ovens are useful in developing countries where the primary energy source is biomass, any type of organic material that can be burned for fire. Fuel burning releases a high concentrations of toxins including soot and carbon monoxide, creating health risks including allergies, asthma, heart disease, and cancer, and kill an estimated 1.6 million people per year. Fuel wood harvesting can lead to deforestation when there is too much consumption, and people often drink uncooked food and unsterilized water as a result. Solar ovens substitute solar energy for fuel energy, allowing people to cook and sterilize water without the use of fuel. In developed countries, the concept of solar ovens can be applied in larger scale to produce electricity as concentrated solar power plants. These use large mirrors over large pieces of land to boil water to produce steam, which can run a conventional generator.
Solar ovens are often donated to developing countries with large amounts of sun exposure including Nepal, Kenya, and Tanzania by volunteer organizations. Concentrated solar power is used in developed countries including the United States and Australia as a form of renewable energy.
Disadvantages
Solar ovens will not work well in areas far from the equator where there is less sun exposure, nor will they function at night or during storms. Additionally, they require reflective panels, which can be difficult for people in developing countries to access.
Materials
-
Aluminum foil for the reflective panel surface
-
Cardboard
-
Glue to attach aluminum foil to the cardboard panels. Regular Glue-All works well.
-
Small wood pieces to create a base so the solar oven can be adjusted to collect the maximum amount of sunlight
-
Screws to hold the wood frame together. Any kind, but they must be between 1.4-1.8 times longer than the wood is thick.
-
Black coffee mug or other small black food container
Design
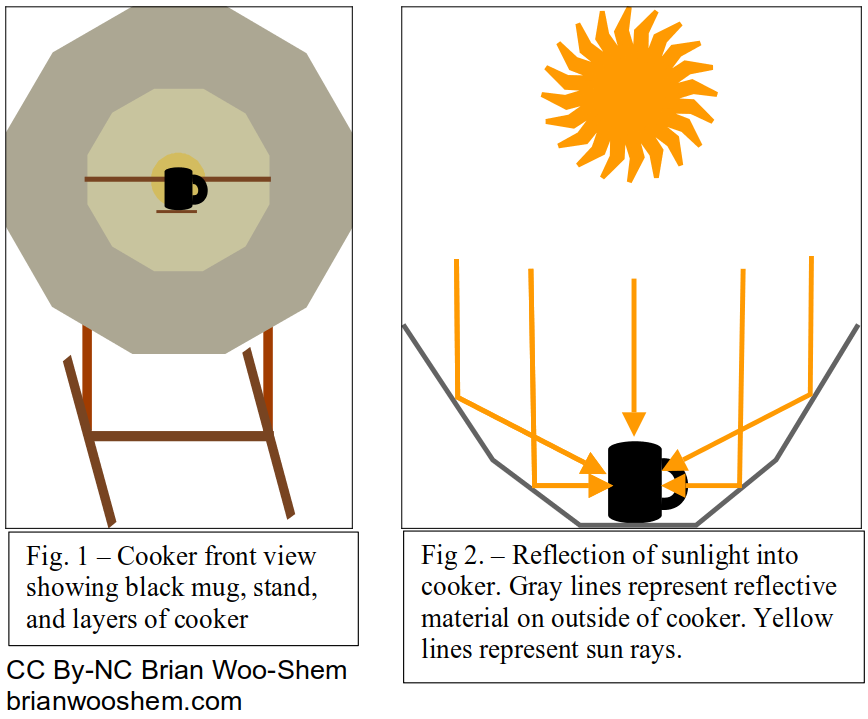
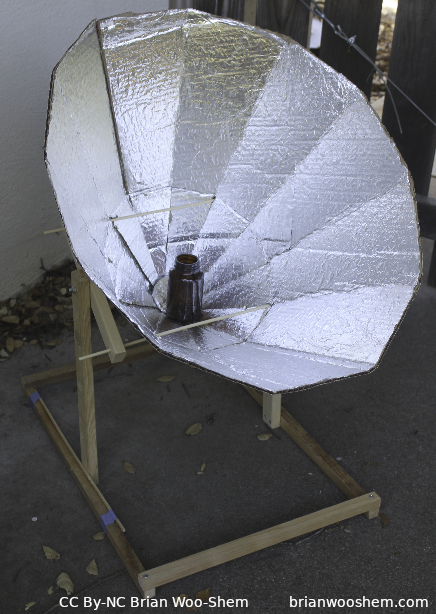
My design is a variation of a parabolic solar cooker adapted to be easier to construct and less expensive from several existing designs. A parabolic concave mirror reflects sun towards a focus in the middle of the mirror. However, I do not have large concave mirrors available, so I decided to use a group of flat panels approximating a curved shape because it is difficult to bend cardboard in the correct direction, and I do not need to hit a single, precise point in order to cook the food. The light is reflected approximately at the mug (Fig. 2). To position the cooker so sunlight reflects directly into the cooker, the cooker will be on an adjustable stand (Fig. 1).
Instructions
Parabolic Dish
-
Lay the 4’ by 2’ piece of cardboard on a table. Single ply, corrugated cardboard works best. Get a ruler or yardstick. Each measurement MUST be made VERY PRECISELY with a straight edge or else it won’t work.
-
Measure the 2 foot mark along one of the 4 foot sides.
 The solar oven with labels.
 -
Place a protractor at the 2 foot mark on that side so the protractor’s flat side is along the edge of the cardboard, and the semicircular side is on the middle of the cardboard. Measure and mark 15 degree increments onto the cardboard along the protractor, starting at 0 degrees, then 15, 30, 45, 60, 75, 90, 105, 120, 135, 150, 165, 180.
-
For each degree marking, draw 2 foot long lines that begin at the 2 foot side mark, and go through that degree mark.
-
Connect the outer tips of each adjacent 2 foot long line with a new line. Label each of these lines “cut”. Each of these connecting lines should be about 6 to 6 1/2 inches long. If not, the the degree markings were not precise enough; go back and fix if necessary.
-
Draw a small mark dividing each 2 foot line into two 1 foot sections. Label the side furthest from the center with “fold”. Then, divide the section closest to the center into a 4” section that is closest to the center, and an 8” section between the 4” and 1 foot sections.
-
Between each adjacent 2 foot line, draw a line to connect each adjacent 1 foot mark and label it “fold”. This line should be between 3 and 3 1/4 inches. Draw a line to connect each adjacent 4” mark, which should be barely over 1” long.
-
Divide each line connecting the 4” marks into two 1/4” sections with a 1/2” section in the middle.
-
For each side, draw a line connecting the 1 foot mark to the nearest 1/4” inch mark to create a very thin triangle and label it “cut”.
-
Cut carefully along the outermost lines along the cardboard, creating a very large semicircle.
-
Flip the semicircle over so you cannot see all of the markings. Paste aluminum foil shiny side up (so the dull side is against the cardboard). Put books or something heavy on top of the semicircle with foil and let it dry for a few hours.
-
After a few hours, remove the books and flip the figure over so you can see the markings again. Cut along all lines labeled “cut”
-
Fold inwards (towards the foil side) along all lines labeled fold. Use a yardstick or table edge along the cardboard when folding to help make the folds straighter.
-
Tape the two long loose ends together with packaging tape.
-
Push the narrow triangular pieces at the bottom together to form an almost conical shape. Use tape until they stay together.
Stand
-
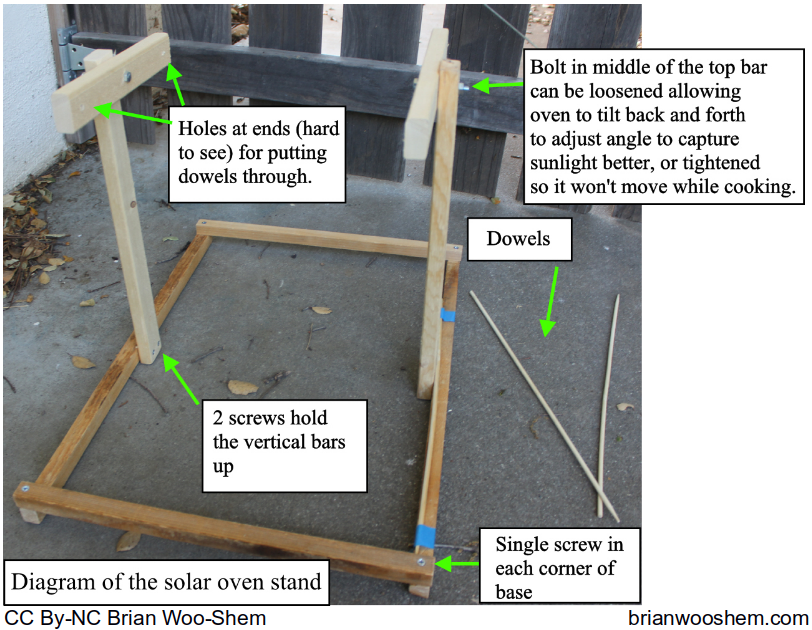
Cut a piece of 1” by 1” wood into two 18” pieces and two 2’ pieces. Cut a piece of 1” by 2” wood into two 18” pieces and two 10” pieces.
-
Drill 3/16” holes in the middle and ends of each 2” piece. Drill 1/2” holes at both ends and the middle of the 10” pieces. Drill 1/8” holes in both ends of the 18” 1 by 1 pieces, and at the bottom end of the 18” 1 by 2 pieces.
-
Put the bolt through the middle of one of the 10” pieces and into the top of one of the thicker 18” pieces. Repeat for the other ones.
-
Use screws to assemble the frame as shown in the diagram.
-
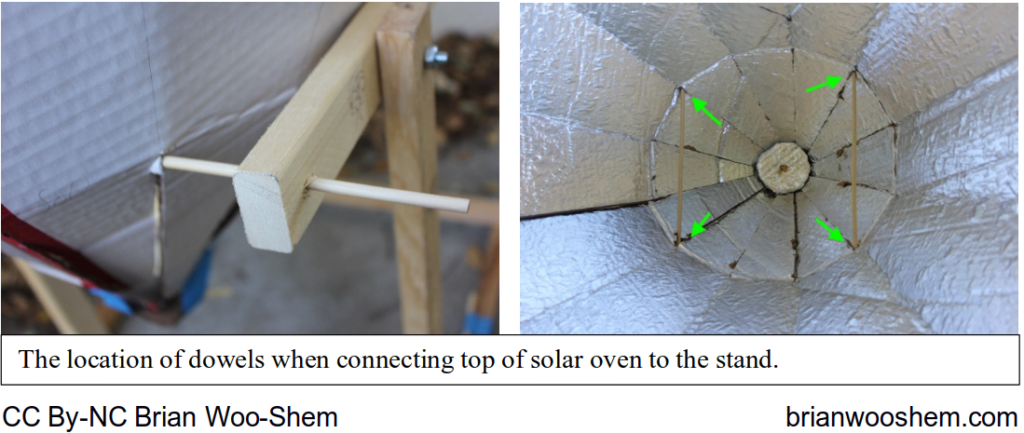
Put a dowel through the outer hole of the top board, poke it into one of the creases on the oven. Continue across the oven, and poke it through the third crease over, then feed it into the hole in the opposite top board. Repeat for the other side.
 from a simple mathematical phenomenon.
 -
Put a dark colored mug or jar in the middle of the oven, and adjust the oven so it is directly facing the sun. Tighten the bolts with a wrench to keep it from sliding downward.

Capabilities
This solar oven was able to melt a marshmallow on a warm spring day within 20 minutes, and boiled water in an hour during the summer.
Update – Scaling Up
Simply by doubling all of the dimensions for the parabolic dish component, I was able to build a solar cooker with four times the energy capture*. I found that resting it in a large open-top cardboard box was a sufficient stand. Using a 2 quart black colored pot, a few cups of water boiled after about an hour on a hot summer day.
* Note: If you’re wondering why doubling the lengths can be four times larger, it is because the area of the circle is:
A = π * r²
A is the area, and r is the radius. For this illustration I will ignore the folds that make the opening smaller; technically the area of the opening not the total panel area dictates the amount of heat collected, but is only a small difference and makes this problem more complicated.
The original has a radius of 24″ for an area of approximately 1810 in². The double-size model has a radius of 48″ and an area of about 7238 in². The number 7238 is four times larger than 1810.